Your Cart is Empty


Makeover of a Chinese Elm - Continued
If you have not read it yet, please read the first part of this makeover of a Chinese elm series here.
However if you are in a little of a hurry right now I will skip through some of the details, although I really shouldn't, and attempt to bring you up to speed quickly with the aid of a couple key photos to the present day.
The trees origin
I purchased the tree in 2009 from a nursery which had imported it from China. The styling was typical of a mass produced product and by someone who had little sensitivity to styling or pretty much any clue of how trees actually grow - as they do not naturally bear pompoms in nature!
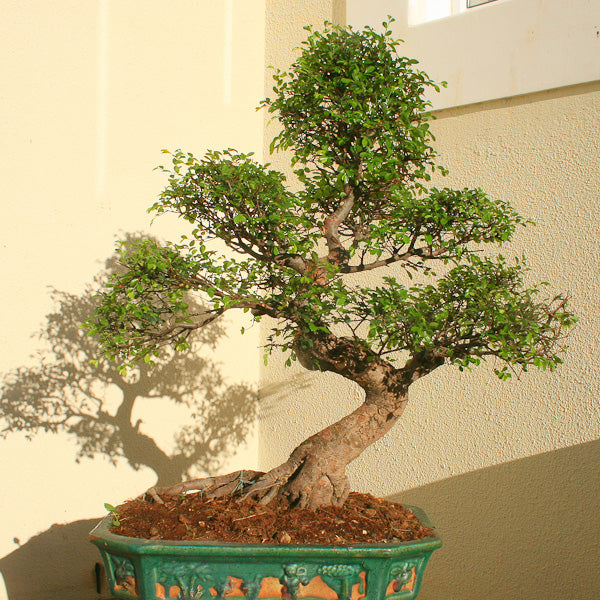
Image caption. The tree as it looked when I bought it in 2009.
First Steps
Sometimes when you buy or find a tree in a nursery which appeals to you, tough decisions are required in order to achieve a much better end result. Sometimes these decisions include having to cut main branches off entirely and in this case this was what was required.
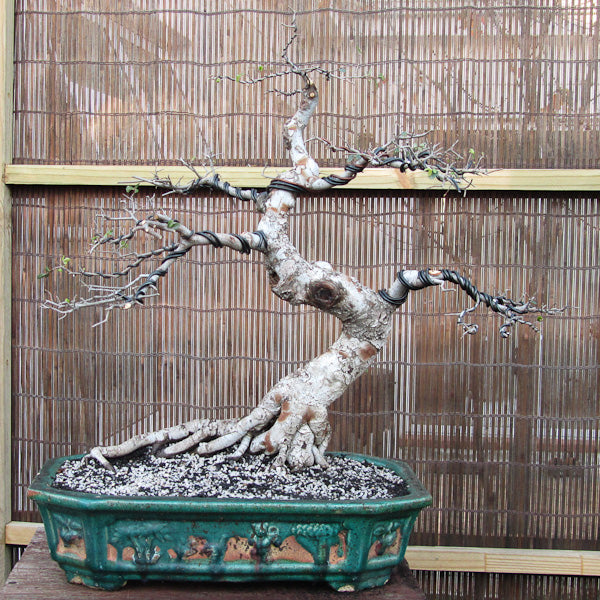
Image caption. In 2010 the tree has taken on a new form.
I removed many branches which lacked taper, were boringly straight and had no ramification. Although it may have been possible to bend the branches and give them some degree of interest, after contemplating the trees styling wholistically, I decided that it would be better to restart the process and bring up the branches uniformly.
Incorrect Technique
I am certainly humble enough to admit that I have made and still make many mistakes when working on my trees. I believe this is how I learn, and in a way, through these blog posts I try to share my mistakes with others and what I have learnt from them in the hopes that someone will be able to avoid repeating them. One of these was my understanding of how to develop ramification.
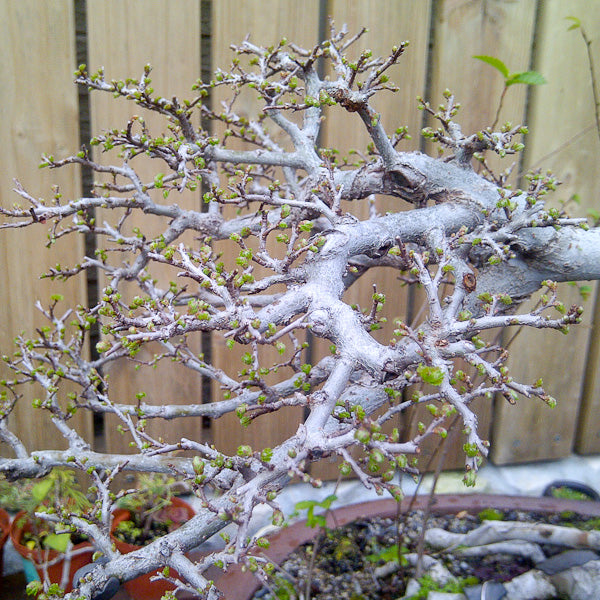
Image caption. How not to develop ramification in 2012.
Essentially the mistake I made was to start the fine ramification too quickly or perhaps phrased differently, I did not gradually taper down from the main branch structure to fine twigs at the outline or silhouette of the tree. Ramification does not occur at the trunk on natural trees therefore it should not do so in bonsai either.
2012 was the first time I went to Japan and began learning bonsai from professionals. This marked the turning point in my bonsai life so to speak.
After that I looked at ramification and the steps required to achieve it differently. You can read more about ramification in deciduous trees here.
Building branch structure
Over the next few years using a process called 'sacrifice branches' which you can read more about here, I focused instead on developing the basic branches or as my teacher calls them the bones or skeleton of the tree.
This stage of developing a bonsai tree should not be rushed as you will regret doing so later. When I write 'rushed,' what I refer to is not allowing the branches to grow long and thick enough before cutting them back again. Failure to do this results in branches which do not taper, and therefore are rather uninteresting.
Rushing the process may also mean trying to achieve the outline of the tree too quickly and doing so with few cuts. Each time we cut a branch, the branch changes direction which means that it creates interest and taper at the same time. If we develop branches slowly through the use of various techniques, then we end up with interesting branches. Fine ramification can always be rebuilt, but to have to remake the main branches on a bonsai takes a lot of time and effort.
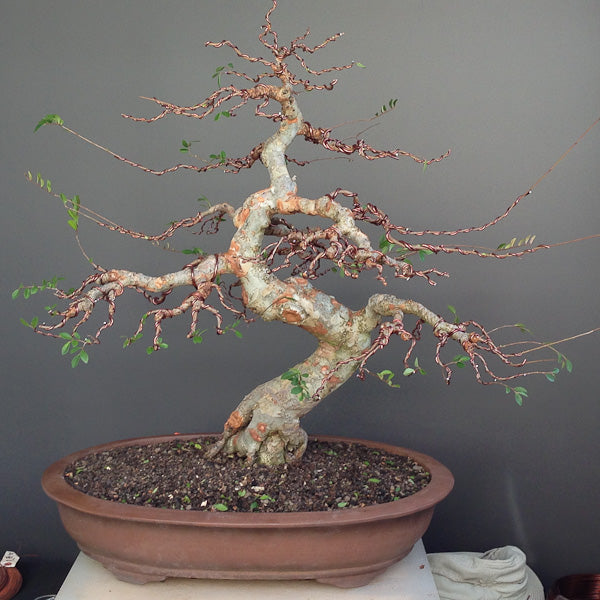
Image caption. In 2014 the tree is beginning to take shape. However there are still some nagging problems
Nagging problems
You know how it is when you have a tree which you are working on and 95% of it seems to be coming together but there is just something which is not working but you simply cannot put your finger on it???
Well this tree presented me with several nagging problems which I was probably reluctant to admit were there and subsequently did not or was not willing to deal with them. Sometimes this is not such a bad thing as once something is cut it is rather challenging to try glue it back :) but eventually a decision is needed.
Problem #1
The height of the tree feels wrong. I think its too tall. It starts out with a lot of energy and this quickly peters out after the bends in the trunk. After that it becomes extremely vertical. So the question one could ask is; "Why would a tree grow in such a manner and then suddenly grow upright?" There may be a few scenario's to explain it but it seems too much to me like trying to justify bad design!
Solution:
The obvious solution would be to reduce the height of the tree. On a species like the elm which heals over very quickly even a cut of the size which will be required will heal over in a season or two provided the cut is finished with sharp tools and sealed properly. Once the apex is removed, one of the side branches could be used to replace it, which will also provide some much needed taper in that area.
Problem #2
There is lack of movement in the tree. Again the trunk and overall impression of the tree talk different languages. There is movement in the trunk yes, but as I explained above, this is strangely omitted in the apical area of the tree. However what I am referring to now is the overall movement of the tree, which does not seem to be much. This is as the apex is above the centerline of the trunk and secondly as the outline of the canopy is more or less equally balanced on either side of the trunk.
Solution:
I will need to move the visual mass of the canopy to one side. Usually this is done on the side towards which the tree is moving. As the tree feels to be moving towards the left in the photo above, on the left of the tree is where the mass should be. The result would be achieved by reducing the growing tips on the right and allowing them to extend on the left. We can further enhance the movement by changing the planting angle of the tree, tilting it further to the one side moving the apex off from the center.
Problem #3
This problem has actually been resolved at this point, but you might recall the grotesque nebari or surface rootage the tree had in earlier images. Many novice growers are attracted to faults in trunks and roots as they mistakenly believe this is what makes good bonsai. In certain circumstances a freak feature may be an attractive attribute but in most cases you will live to regret the decision to purchase that tree.
Solution:
Over several seasons I slowly reduced the pipe-like surface roots using root cutters, not all at once as to minimize the shock to the tree. It may have actually been a good idea to ground layer the tree and maybe it will still be done in the future. The roots I do not feel firmly anchor the tree to the ground and thus do not provide the visual stability which is so important to a good bonsai specimen.
Present day
So let's fast forward 2 more years till the present day.
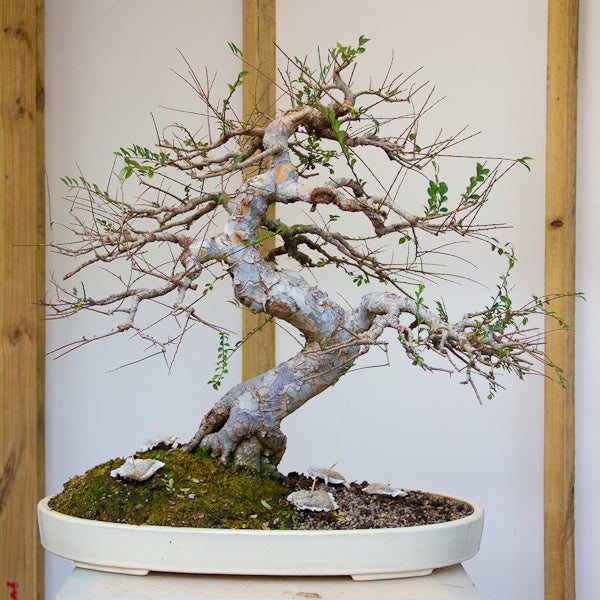
Image caption. The elm has been repotted now, in spring 2016.
Solutions
Solution #1
The apex has been cut and you can see the new leader is of a much thinner girth so the taper has been improved, plus the movement of the tree in the lower areas has been echoed in the apical areas also.
Solution #2
During the repotting I changed the planting angle quite a lot lifting the tree on the left which has provided a lot of movement towards the right of the tree (the opposite of what I thought would be required in 2014). This has complemented the movement of the new apex also. The sphagnum moss covered the root ball on the left is there to provide additional water retention as the roots were considerably exposed in order to change the planting angle and also fit it into this much shallower forest container. Professional Mix was used as the new growing medium.
Since repotting in spring I have allowed the tree to grow freely to confirm that it recovered well to the ordeal. It has and had grown considerably. The photo taken above was of the tree after it had been pruned back coarsely and defoliated.
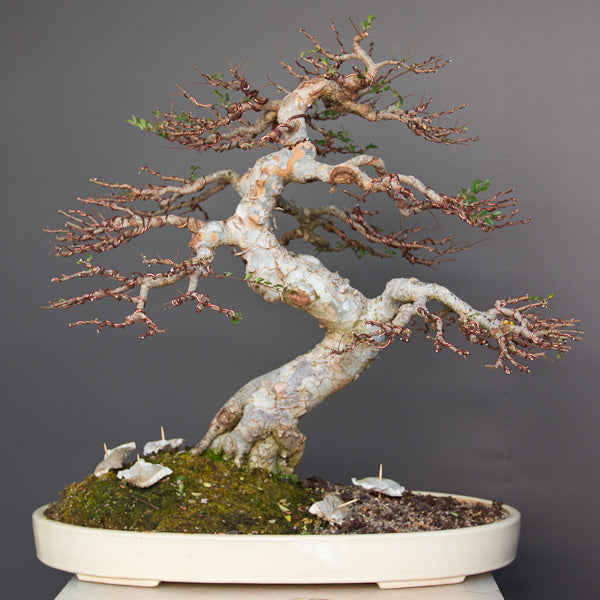
Image caption. After a couple hours of wiring and the tree is looking better.
I hope you like what has been changed on the tree and that you will continue to follow the progress of this exciting tree. Please leave your comments or suggestions below.
6 Responses


Leave a comment
Comments will be approved before showing up.

Gora
December 01, 2016
I love the progress on ths tree. The advise and explanations given is precise, acurate and most impotatnly, it is very usefull as easy to apply. Definately gives good encouragement to people like me who are just at the begining phase of bonsai. Thanks Terry. Really apreciate what you are doing for the bonsai comunity.
Best Regards
Gora
PS: When can I come over and collect this tree for my collection? Lol.