

Understanding Airport Runway Lighting for New Pilots
For new pilots making their first nighttime approach to landing, when the runway comes into sight, it can easily appear as a complex and confusing sea of lights and colors.
While we may not be able to take away all the butterflies that come with tackling that first night landing, it pays to dedicate some time prior to the flight for reviewing all the airport runway lights you can expect to see.
Knowing their configuration, spacing, color, and purpose has the power to bring clarity to the confusion and to train our eyes to pick out and understand what we are seeing as we make that approach to landing.
Pilots can become confident in nighttime landings with experience and familiarity with airports and lighting systems. Regular practice, review, and study of charts and procedures will help them to safely navigate low visibility conditions.
Let's start!

Runway Edge Lighting
It is important for pilots to have a visual guide to the width of the runway when landing and taking off at night. At their most basic, runway edge lights are a series of white lights positioned in a row on either side of the runway. Runway edge lighting can be classified as either high, medium, or low intensity, with high and medium-intensity lighting being adjustable and having the capability to vary in intensity.
The FAA allows there to be no more than 200 feet in between each individual runway edge light in a high-intensity runway lights (HIRLs) system or medium intensity runway lights system (MIRLs). The exception to that rule is at intersections between the runway and a taxiway or another runway. At those intersections up to a 400-foot gap in edge lighting is authorized.
On runways with ILS capability, the runway edge lights will be yellow rather than white for the last 2,000 feet of the runway or half the runway length for runways shorter than 4,000 feet in length. This serves as an additional visual indicator that the pilot is nearing the end of the runway.

Runway End Lighting
The ends of runways are marked with runway end lighting or runway threshold identification lights (RTIL). The row of lights that make up runway end lighting extends all the way across the width of the runway at either end. When viewed from the approach side of the runway, the lights appear green.
This lets pilots know that they are at the end of the runway, with the full length of the runway stretching out in front of them. From the opposite side, the lights appear red. This informs pilots that they are approaching the departure end of the runway and the entire runway is now behind them. They must either takeoff or stop by the time they reach the red runway end lights.
Runway End Identifier Lighting
As you make your approach to landing, you will see a single runway end identifier light (REIL) on either side of the end of the runway. These flashing green lights face the approach end of the runway to help pilots identify where to land and to validate that they are not landing short of the runway.

Runway Centerline Lighting
The row of lights extending down the center of the runway is called the runway centerline lighting. The lights are white near the approach end of the runway and transition to alternating white and red lights at 3,000 feet from the end of the runway.
The final 1,000 feet of runway is indicated by all red centerline lighting. Runway centerline lights are spaced fifty feet apart and are required for all CAT II and CAT III runways as well as for some CAT I runways.

Approach Lighting
Unlike other runway lighting which is situated either on or adjacent to the runway, the approach lighting system is a set of lights that is positioned on the approach area of a runway and stops at the threshold. Its purpose is to indicate the direction of the runway and allow pilots to visualize that direction from greater distances.
The lighting extends 2,400 to 3000 feet into the approach area for a precision, instrument runway. Non-precision instrument runways have lighting beginning 1,400 to 1,500 feet into the approach area.
Approach lighting comes in many different lighting configurations including:
- MALSR
- MALSF
- SALS
- SSALS
- SSALR
- SSALF
- ODALS
- ALSF-1
- ALSF-2
- CALVERT I/ICAO-1 HIALS
- CALVERT II/ICAO-2 HIALS.
The most basic approach lighting systems feature a series of seventeen white lights in a cross formation. This type of lighting is common at regional airports. Many larger international airports utilize a system with a more complex structure and yellow and red lights in addition to the standard white.
Regardless of configuration, a common feature of approach lighting is the decision bar. This row of closely spaced white lights is positioned perpendicular to the runway. It is located 1,000 feet prior to the approach end of the runway and serves as a visual reference point for the pilot to make a final call on whether to continue the approach to landing or to execute a go around if something is not quite right.
In some cases, sequenced strobe lights also illuminate down the approach path and appear to move in the direction of the runway, starting at the beginning of the approach lighting system and ending at the decision bar.

PAPI and VASI Lighting
One of the challenges of night flying is overcoming night flying illusions. If the terrain prior to the runway is unlit and featureless, on a dark night it can be hard to visualize our glide slope. Thankfully, there are two special sets of lights designed to assist with that problem.
Precision Approach Path Indicator (PAPI)
PAPI is a set of four lights in a row placed perpendicularly to one side of the runway to give pilots a visual indicator of their glide slope. The apparent color of the lights changes based on your position relative to them and the color that pilots see provides feedback on what adjustments if any they need to make to achieve proper glide slope.
Visual Approach Slope Indicator (VASI)
VASI lights function similarly to PAPI lights, however rather than one row of four lights, the VASI system uses two sets of two lights, one placed in front of the other. PAPI and VASI lights can be located on either the left or right side of the runway.
More on VASI and PAPI
A PAPI lighting system has five possible light combinations while VASI systems have three. For both systems, if two of the lights are red and two are white, the pilot is on the glideslope. For PAPI, the left two lights will be white and the right two red while, for VASI the front set of lights closest to the approach end of the runway will be white and the back set red.
If the pilot is coming in too high, for both PAPI and VASI, all four lights will be white. Too low, and all four lights will be red. PAPI has two additional feedback indicators with three white lights and a single red light on the right indicating a slightly high descent or three red lights with a single white light on the left corresponding to a slightly low approach.
Both PAPI and VASI lighting are useful tools because they provide pilots with a continuous means of monitoring and adjusting their glidepath even in dark conditions when terrain reference points are unavailable. These lights can be seen up to twenty miles away at night and as much as 5 miles away during the day.

Taxiway Lighting
Taxiway lead on and lead off lights help pilots to visually identify and locate the intersection of a runway and taxiway at night. Taxiway lighting is made up of alternating green and yellow lights that branch off from the centerline of the runway and connect to the centerline of the taxiway. Taxiway lighting is useful both for exiting a runway onto a taxiway and when taxiing out from the taxiway to the runway for takeoff.

Touchdown Zone Lighting
The touchdown zone on a precision approach runway is marked with touchdown zone lights designed to help with landings in lower visibility conditions. These lights consist of groups of three white lights placed to the left and three white lights placed to the right of the runway centerline lights. These lights start 100 feet before the runway threshold and continue 3,000 feet down the runway or to the midpoint (whichever is less).
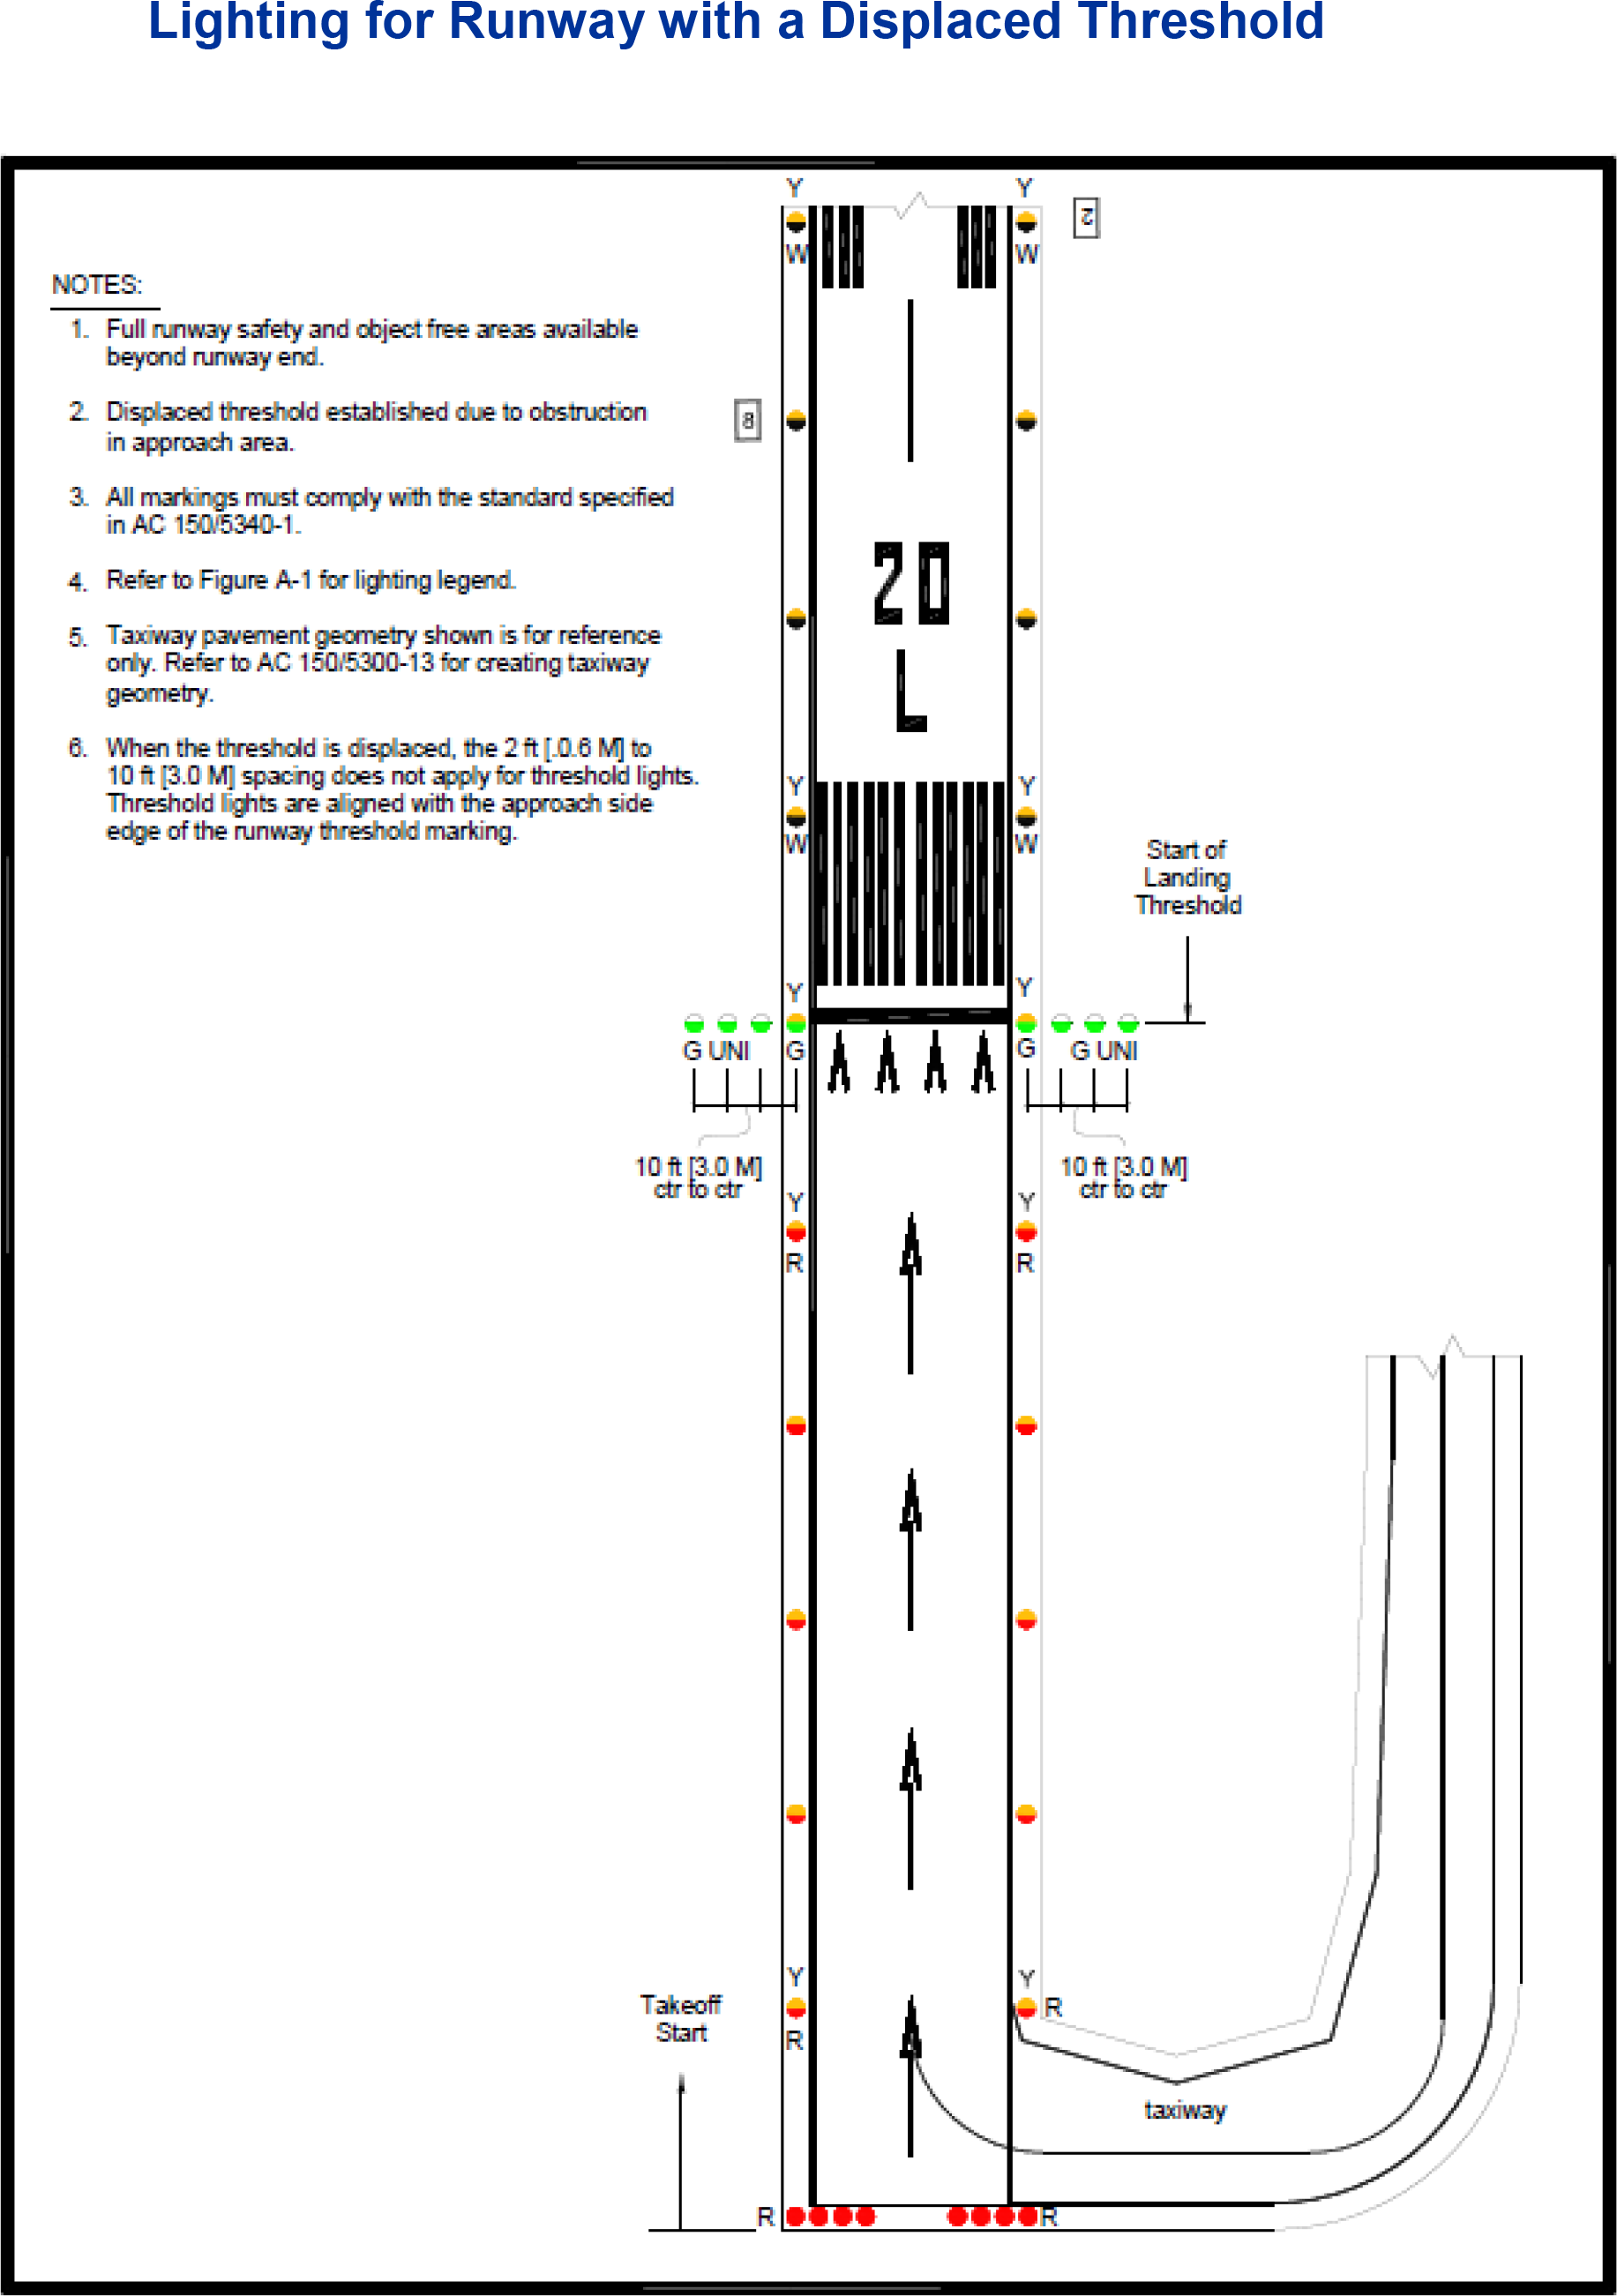
Displaced Threshold Lighting
Displaced threshold lights consist of a row of red edge lights running parallel along each side of the runway along with groups of three red lights to the left and three red lights to the right of the runway centerline similar to the configuration of touchdown zone lights.
The centerline of a displaced threshold lighting system is marked with a row of white lights. The red edge lights signal that the area is not suitable for landings although it can be used to begin takeoffs.
Pilot-Controlled Lighting
Airports without a tower may use a pilot-controlled lighting system (PCL). This system can provide cost savings by means of decreased electrical costs and is designed to be radio activated by pilots within 5 miles of the airport. The pilot can turn on the lights and select the preferred illumination intensity all by specific keying of the microphone button.
Lights that are activated by pilot-controlled lighting include runway lights and potentially VASI, PAPI, REIL, and perhaps even taxiway lights depending on the airport. If you will be flying into an airport that uses a PCL system, be sure to look up the proper radio frequency as part of your preflight preparation.
Also, it is important to know and remember that pilot-controlled lighting systems turn off 15 minutes after activation. Be sure you have completed your landing prior to that cutoff.
Difference Between Runway and Taxiway Lights
To the untrained or new eye, runways and taxiways can look similar in the dark. The good news is that there are a couple of lighting differences pilots can look for to confirm whether they are entering a taxiway or runway.
While runway edge lights are white, the edge lights on taxiways are blue. This is the easiest and most reliable way to use lighting to distinguish the type of surface you are entering.
At major airports, pilots can also compare the color of the centerline lights. Runway centerline lights are white, and the lights on taxiway centerlines are green. Taxiways on smaller airports may not have centerline lights at all.

Tips and Takeaways
When it comes time to plan your night flight, consult the Airport/Facilities Directory (A/F D) as well as the instrument approach charts to confirm what type of runway lighting you should expect to see at your destination and whether it is pilot activated or not. During preflight, check NOTAMs to confirm the operational status of the destination lighting system.
An airport at night is highly illuminated and it is important for pilots to be familiar with the types of runway lighting they can expect to see. Advance study and practice identifying and using runway lighting will make night landings much smoother and less intimidating.
Ready to start flying? Make sure you are prepared with a copy of ASA Pilot's Handbook of Aeronautical Knowledge! 
|
Pilot's Handbook of Aeronautical KnowledgeProviding basic knowledge essential for all pilots, from beginning students through to the advanced certificates, this Federal Aviation Administration (FAA) publication introduces readers to the broad spectrum of knowledge required as they progress through pilot training.
|


2 comments
Ivan Samailovic
Dear Pilot Mall staff,
Good description of the lighting system but I did not find answer on my question.
According to ICAO Annex 14 rules Axis of Central Line Lights can be shifted left or right from Runway Geometrical Central line not more than 60cm.
In my case we shifted Central Line Lights from Runway Geometrical Central line about 30cm.
Question: Is there any rule or recommendation regarding positioning of single light relative to Central Line Light’s Axis?
Or to be clearer, what is allowed deviation of single light position (left or right) relative to Central Line Light’s Axis?
I hope that you can help me with this issue.
Regards
Chuck TImberlake
Excellent description or the lighting system!
Suggestions:
Use actual numbers when describing distances. Because its hard to catch the fifty feet distance in the 3rd paragraph. But it would be easier to see the 50 ft distance in the third paragraph.
To also include a full length runway with lights on the side – would back up the description – and give a greater visual reference of the lighting system.
Remember – this is a leaning tool – and the best way to learn – is to use as many senses as possible!
But still – very nicely done!